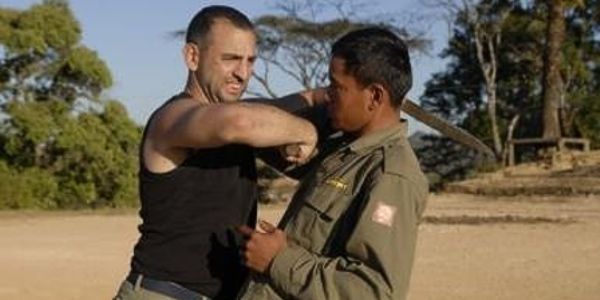
I slowly formulated a plan as to what I would teach the men. For years, I had been developing a system of practical fighting for police and military in Taiwan and other countries. The empty hand fighting was largely based on Khmer Bokator and Muay Thai Boran, but also included grappling techniques from Kuntaw. The stick and knife fighting would come nearly 100% from the Philippines.
Ethnic cleansing has been going on in Burma for more than fifty years. The recent cyclone has shown the world how disinterested the Burmese government is in the well-being of its own citizens. Many people also don’t know that Burma is composed of countless ethnic groups, most of whom the junta lead government is trying to kill.
In Shan State, the Burmese army troops frequently burn villages to the ground. They use gang rape on very young girls as a means of intimidation. They force Shan villagers to works as slaves, porters, carrying ammunition through the jungle until they die of over-work and starvation. Shan civilians are used as human mine detectors and combat shields. The Burmese soldiers hide behind the civilians during firefights.
The war in Burma has created more than two and a half million refuges. Some people refused to leave, however. After their village was burned and their families raped, tortured or murdered, many men join the resistance, the Shan State Army.
The Shan State Army (SSA) is one of the rebel groups fighting against the Burmese junta. A friend of mine, from the Swedish army, had been working with them for years. He arranged for the rebels to smuggle me across the border and have a meeting with their commander, Colonel Yawd Serk. I was asked to be his guest at a huge banquet, where he asked me to teach hand-to-hand practical fighting to his soldiers.
For the next several months, on and off, I would sleep in the cinder block house, belonging to the Lieutenant.
Although enemy camps were so close that we could see them on the next hilltops, it is amazing how well you sleep when you are surrounded by land mines and armed soldiers.
I don’t like to train early in the morning. I have always been a firm believer that any training you do at 6:00 AM could be done much better at 10:30. The next morning, during a leisurely breakfast, I slowly formulated a plan as to what I would teach the men. For years, I had been developing a system of practical fighting for police and military in Taiwan and other countries. The empty hand fighting was largely based on Khmer Bokator and Muay Thai Boran, but also included grappling techniques from Kuntaw. The stick and knife fighting would come nearly 100% from the Philippines.
One of the biggest reasons I do martial arts is for the cultural exchange. Now, because of my internet show Martial Arts Odyssey, people in Cambodia are watching videos about Kuntaw, and my Filipino friends are watching videos about Bokator. It is such great that the people of southeast Asia can share their culture and martial arts with each other on the internet. After I taught the soldiers in Burma, I filmed their martial art. The Shan people practice Lai Tai kung fu, and now my Filipino friends are learning about Burma.
I grabbed a Shan knife, which is longer than a bolo, sharp on one side, and tapers to a point. As I was walking up the trail to the training ground, a group of foreign medics came running by in formation.
“Come join us, do some cardio exercise.” They shouted to me.
“I hate running.” I answered. “In fact, I learned to fight so I don’t have to run.”
The soldiers sat at the position of attention on the parade ground. Nearly one thousand Shan rebels, whose people had been in a constant state of war from the time of their grandfathers. They wore uniforms, but most covered their feet with flip flops, or went barefoot. Their weapons were old M-16s left over from the Vietnam War and AK-47s made in China.
In my system of practical fighting, we start with striking, then move to grappling, and end with knife fighting and stick fighting.
Before I began, I explained the program to the soldiers. Shan language is pretty close to Thai, so I use that language to communicate with them. My assistant is a Shan sergeant, named Hsai Kong, who studied Shan martial art his whole life. He speaks fluent Thai, so he helps me, translating the parts that I have trouble expressing.
Practical fighting contains 18 basic strikes, designed to take a non-fighter and teach him to fight inside of a week or a month. Once the fighters know the routine, they need to practice everyday. The practice begins with one session per day, of the eighteen strikes in sequence, every day, five reps each, on each side of the body. This will increase over time to ten and then twenty reps per strike on each side of the body. Just as with Kuntaw, we can use the entire body as a weapon. We start with the head and work down to the feet.
I got the soldiers on their feet and started. The warm up cane from Shaolin Temple. We all stood in a low, Shaolin horse stance, with hands out straight in front of you. On the first day, we only held the position for one minute. Then we stood up straight and shook it out. Next, back down in horse stance for one minute, this time doing curls with imaginary weights. Then rest. Then horse stance again, doing overhead presses with imaginary weights. We repeated the horse stance, this time doing peck deck exercise with the arms. As the weeks of practice go on, each set of horse stance could be increased to three minutes, then five, ten… Even without weights, doing all of those curls in the air, you will feel the burn.
After the warm up, I explained the basic premise of self-defense and the practical fighting I would teach them. Never show your intentions before you move. Do not telegraph. Wait for the right moment, and then strike hard. Never threaten or even appear aggressive till the exact moment that you attack.
When someone gets aggressive with you on the street, don’t scream back. Don’t look mean. Look humble. Put you hands in center of chest in prayer position and look penitent.
In any type of stand up grappling, the man with his hands on the inside is in the dominant position. In Thailand, we spend hours practicing our Muay Thai wrestling. Two fighters lock up, head to head, grabbing each other behind the neck. At the beginning of the exercise, they both have one arm inside and one arm outside. When the coach signals for the exercise to start, they fight to get both their arms on the inside. The fighter with two hands on the inside is in a better position to throw his opponent.
This is an exercise which can also be practiced as part of practical fighting. The wrestling is good upper body work. The throwing is an excellent skill to develop.
The reason you put your hands in prayer position when someone is threatening you, first, because this will tend to make the attacker relax and get careless. Second, because now, both your hands are on the inside. You have already got the dominant position, and you haven’t even begun yet. If your hands are on your chest, the attacker will probably grab your shoulders or throat from the outside. Strike one of practical fighting is the head butt. When the man grabs you, you grab the back of his head, pull him forward, and smash his face with your skull. He is moving forward and you move right at him, using his forces against him. The power with which he was grabbing you is now directed at his face, shattering his nose or chin.
When teaching soldiers, it is important to remember that they aren’t martial artists or professional fighters. They need to learn simple, effective techniques that could save their lives in combat. But, when teaching people who have a longer time frame, these techniques can be expanded. For example, the simple head but can be made doubly as effective if before you strike, you drop, bending your knees, bringing your head down below his chin, and then pop back up with all your bodyweight, launching your head into his face, like a bullet.
Always remember, with a head butt, contact should be head-to-face never head-to-head.
In a longer course, we can actually practice these techniques with a partner. But for the short course, I have the men practice five times in the air, grabbing and striking an imaginary opponent. On the first day of training, they will do five of each exercise, eventually, over a period of time, they will build up to twenty of each.
Next, moving down the body from the head to the elbows, we learn the elbow strike.
For the rest of the exercises the men are standing in a comfortable fighting stance. The legs are roughly shoulder with width apart, with the dominant leg (for most people this is the right leg) slightly out in front. The knees should be slightly bent and a fighter should always avoid getting in a straddle stance.
The hands are up in a modified boxing stance, slightly higher than boxing to protect the face against elbow strikes. The elbows are slightly further apart than in boxing because you need a good field of vision all around, to be able to see kicks coming up from underneath.
Practical fighting includes six basic punches: Left jab, straight right, left and right upper cut and left and right hook.
Like in boxing, everything works of the left jab. When the jab is thrown, the whole entire weight moves forward. The hip twists into the punch, and the shoulder turns into it. The entire body must work together, with the punch originating somewhere down, deep in the Earth, working its way up the leg, to the hip, then to the shoulder and down the arm, focusing the full force of the blow on the two first knuckles.
In the short course, this is pretty much where the explanation would stop. Then the soldiers would practice five times. But for students who have time and desire to practice, in addition to hitting the air, you should hit a punching bag or other object many times. Afterwards, check your knuckles. If only the first two knuckles are red, then you are executing the technique correctly. If all of the knuckles are bruised, then you need to concentrate on only hitting with the first two knuckles. This will give your punch a devastating, penetrating force, like stabbing someone with the point of a knife.
Another advanced technique is to remember to tuck your chin into your shoulder for protection, so you don’t get hit in the chin and knocked out, while punching.
The right punch works the same way as the left. On both the left jab and straight right, remember to turn your fist over when you are making contact with your opponent. Concentrate on turning into the punch, twisting the hip, turning the shoulder, and landing on only two knuckles. Before you throw an uppercut, make sure to bend your knees, drop your weight, and explode upward, driving your fist into your opponent’s solar plexus, floating ribs, chin, or nose. On the hook, twist the hips and really turn your body into the punch. Don’t rotate your hand on a hook. Most martial arts teach that you should rotate your hand on all punches. But, in pro-boxing, you don’t rotate your hand on a hook. Still, you will need to concentrate and make sure that all of the force is landing on the first two knuckles.
Muay Thai Boran contains sixteen basic elbows. Bokator has even more. But for practical fighting, we only teach three: overhead, uppercut, and hook.
To execute the overhead elbow, simply rotate your elbow from fighting position, do a big inward circle, brining the elbow high up over your head, then crash down on your opponent’s skull. Turn your body into the strike, brining all your weight down, concentrated on the point of your elbow. As a more advanced technique, lift your foot when you begin the elbow’s inward circle, smash your foot down on the ground or on the opponent’s foot at the exact second that your elbow makes contact with his head.
The uppercut elbow is the same as the uppercut punch. Drop low first, by bending your knees. Then, pop tall and strike your opponent under the chin.
The hook elbow moves just like a hook punch. You will use this one to strike your opponent in the temple, the side of the jaw, side of the nose, or to slice the skin of his forehead, causing blood to run into his eyes.
The soldiers practiced each elbow, five times on each side. You want to build up to doing each elbow twenty times on each side.
Always grab the back of your opponent’s head before doing a knee strike. Pull him into your strike, bring your knee up into his solar plexus. Advanced fighters can strike the opponent in the chin with their knee. Another advanced variation is to drop your body weight when you grab the man’s head, then jump back up and hit him with your knee while he is on the way down. Stand up on the toes of your base leg when throwing a knee.
The hook knee is thrown exactly like a roundhouse kick. The entire body has to turn into. You must stand tall on the toes of your base leg, and rotate into the strike. Make sure you hip is fully engaged in this strike.
When kicking, use your shin, rather than your foot to hit your opponent. The shin kick, roundhouse can strike low, on the muscle of the calf. In Kuntaw, the same technique is used as a sweep, where you strike with your foot. Striking with your shin can still sweep the opponent, but it can also bruise him. If done correctly, this kick will cause his leg to drop out from under him and become useless. The next kick is just above the knee cap. Basic students are taught to throw a round house, just above the side of the knee. Advanced students learn to do a straight kick, above the top of the front of the knee, striking with the ball of the foot.
There is also a downward knee. This is used as a defense against a kick. When a kick comes on the right side of your body, you block it by bringing your left knee high in the air, across your body, and it smashes down on your opponent’s kicking leg.
The entire knife fighting portion of practical fighting was taken from Filipino martial arts.
The best rule for self-defense knife fighting is, don’t fight with knives. If someone else has knife, pick up a stick, a rock, or a gun and take care of that situation.
Although the Filipnio arts of Kuntaw and Arnis have nearly unlimited numbers of knife strikes, practical knife fighting has to be simple. So, there are only five. Right downward slash, left downward slash, downward cut on the top of the head, upward cut through the groin and midsection, and the thrust.
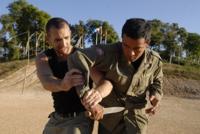 The basic knife fighting stance is the same as Kuntaw stance. The fighter is in normal fighting position, but with the knife held in the rear hand, more or less at the center of the chest. The empty, left hand is held out in front, to be used for grappling or disarming.
The right downward strike is done by stepping forward and bringing the blade down on the opponent’s shoulder. Imagine cutting all the way through his body, from shoulder to hip, at a 45 degree angle. The left downward strike is identical. In Kuntaw, you learn to change the knife hand, handing the blade off from the right to the left. But for the soldiers, the simple technique is that the knife remains always in the right hand.
Next, step forward, bring the knife up over your head, and smash down on the center of the opponent’s head. You step at the same instant, imagine the blade cutting from the center of the skull all the way down, to the naval.
For the upward strike, the blade rotates out and in toward your body. It circles around, and comes up, under the opponent’s groin. It continues on, cutting all the way to his chin.
The final knife strike is a thrust. You simply step in, and drive the point of the blade into the opponent’s solar plexus, coming out somewhere in the back between his shoulder blades.
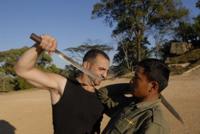 As with all other techniques in practical fighting, we practice. Each strike is practiced five times on each side, building up to twenty times on each side.
In more advanced training, we can work with partners to practice grappling and disarming techniques.
The opponent strike with his right hand, the blade coming at you from the left side of your body. You block his blade with your blade. At the same time, you place your empty hand against his wrist, redirecting the strike in a safer direction. Next, grab the wrist, and slash it with your blade. Still holding tight to the wrist, slash him under the arm pit. A slash to the wrist will usually disarm an opponent. A slash under the armpit will cause lethal bleeding.
If your opponent thrusts, you step in, blocking with your blade held vertically, pushing his blade down, and away. Use the combination of his motion and yours, while he is moving forward and you are moving forward, rotate your knife up into a stabbing position and stab him in the lower abdomen. With your free hand, you can grab him and pull him into your thrust.
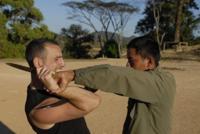 The techniques can get longer and more and more complex as you practice. You can do the block, slash to the wrist, slash to the armpit, then bring the blade up through his groin, wind milling around, and smashing down on his head.
In Kuntaw we frequently use the butt of the knife as a striking or grabbing weapon. Use the butt of the knife as a hook to grab the back of is head, the same as we would do in Muay Thai. Use your body weight to pull him down and knee him in the face Step in, insert your knife into the crook of his arm and get leverage under his arm pit. Twist his arm with your blade behind him. You can easily use your free hand to take away his blade now. If it doesn’t come out easily, press against the flat of his blade with your empty hand, pushing his blade in such a way, that the handle slips through the gap between the tips of his fingers and the palm of his hand. Once he is disarmed, you can follow through, pushing on your own blade, breaking his arm and shoulder.
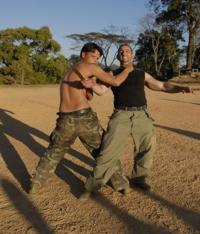 When a thrust or strike comes, you can block it gently with your free hand. Don’t grab the wrist. Just ease the hand in a safe direction, so you don’t get stabbed. Step in with your whole bodyweight, and trap his knife arm against his chest. Now, use the butt of your knife in the side of the jaw, temple, or the back of the head. A Antonio Graceffo: Philippine Knife Fighting riation of this technique, instead of the repeated but strikes, you can stab the opponent in the throat or kick his legs out from under him.
All of the empty hand fighting techniques can also be used in a knife fight. For example, the opponent thrusts. You block, grab his wrist and pull him towards you, using his momentum. Just be careful to redirect his blade away from you. As he is coming in, hit him with a knee in the solar plexus. Then, reverse his knife hand, press your full bodyweight against his elbow, and drive his knife right into his googlies. While trapping an opponent’s knife arm against his body, you can step around, behind him. You can step on the back of his knee, which will drive him to the ground. Rest your body weight on the beck of his head, force him forward, stabbing him in the face with his own blade.
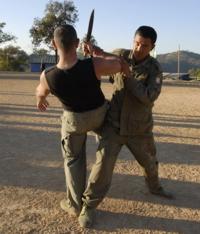 In truth, although I like learning and teaching these techniques, I think the best defense is to avoid any situation even remotely similar to those described above. Try to grab anything and use it to your advantage. Throw sand in his eyes. Do anything, and get away.
For the Shan soldiers in Burma, however, fighting is not an option. They have been forced into a horrible war, where most of the casualties are innocent civilians. If they use these techniques to take out even one Burmese soldier, I will be happy.

